As a wiki, we encourage users to edit pages with the latest up to date and factual information. This page gives you some guidelines for editing and detailed instructions for several common things that you may need to edit.
There are two areas we constantly need help with: Add a New Hidden Item on the current event location page and Add a New Position for Hidden Item on the current event location page.
We have a Test Page where you can practice editing if you have never done it before.
Overview
| Overview |
- Only use factual information that has been taken from the game, not opinions or speculation. You are responsible for ensuring that what you are adding is based on truthful information. The wiki's administrator(s) and moderators may choose to verify a user's edits at any time to guarantee accuracy.
- If you feel a page could be structured better, talk to a wiki administrator about it first. A lot of time and effort goes into creating these pages for the wiki users who find them helpful. Sometimes pages are structured a particular way for a reason.
- If you feel some information should be removed from a page, talk to a wiki administrator about it first. Users like to see the history of how things progress as the game is updated. New information can be added, with the older information still available for anyone who wishes to use it.
- Creating pages is the job of the administrator and the content moderators. If you have an idea for a new wiki page, talk to a wiki administrator about it.
- Do not remove any large sections from pages, as there is coding and templates in place to keep the pages looking "clean".
- Do not delete any images from pages, especially the location pages. Images are helpful for people. If you find something that doesn't fit, or if you think it's not suited for that page, talk to a wiki administrator.
- The administrator and content moderators have the right to protect pages. They may choose to protect a page if they feel it is necessary to protect it from spammers, or if it is a special page that should only be edited by the administrator/content moderator.
Editing a Location Page
| Editing a Location Page |
We have a location page for every location within the Hidden City. When a new location is added at the start of a new event, the admin team will create a new location page for it. This becomes the current event location. Especially for the current event location, we need help getting all the hidden items onto the page! Further, we need help getting a brief description of the hidden item's position onto the page, until we have time to "fill in all the blanks".
If you are looking at a location's page, you may discover something is missing or something needs to be updated. Common things include:
- You found a completely new hidden item in a location (especially in the current event location). See Add a New Hidden Item
- You found a new position for a hidden item in a location (especially in the current event location). See New Position for Hidden Item
- There is an "item map" image with numbers, but all the text entries are still bullets. See Item Map with Bulleted Text Entries
- There is an "item map" image with a number, but a text entry for the position does not exist. See Item Map with Missing Entry
- The name of a hidden item has changed (e.g., "Scales" changed to "Balance Scales"). See New Name for Existing Hidden Item
- You want to add a difficult silhouette to the gallery on the location's page. See Add Difficult Silhouette to Gallery
Add a New Hidden Item
You have been asked (by the game) to find a hidden item, and that item's name is not in the list of items for the location. This is particularly likely in the current event location.
First, review the existing list of item names to determine if maybe the item's name was changed by the game. Past examples include Glasses changing to Eyeglasses and Smoking Pipe changing to Pipe. If so, update the name of the item (see section New Name for Existing Hidden Item).
If you are sure it is a new item,
1. Determine where the new hidden item should be alphabetically.
Click to edit the hidden item next in line alphabetically. For example, if you are trying to add the hidden item Amulet Pouch and have determined that it should be just prior to Angel, then click on the edit pencil on Angel.

2. If your new hidden item would come last in the list, then click on the edit pencil of the next section.


3. Position your cursor at the start of the word/term and press Enter. In this example, place your cursor just before the A in Angel.

4. Move your cursor up to the blank line you just added.


5. On the editing toolbar, click the dropdown menu beside "NORMAL TEXT".
Choose "Sub-heading 1".


6. The editing toolbar will change to show "Sub-heading 1".

7. Type your new hidden item name. In this example, type Amulet Pouch. Remember to use the EXACT same spelling and capitalization as the game uses.

8. Press Enter.
At this point, the editor might scroll to the bottom of the page. I don't know why. Don't panic. Simply scroll up until you are back in the correct area. You will notice that your cursor is still just after the sub-heading you added.
The word/term you typed will turn into a sub-heading, and the editor will revert to "NORMAL TEXT".

9. Type one asterisk and one space. The editor will assume you are trying to insert a bullet point (which you are) and will convert your asterisk/space to a bullet point.

10. Type a phrase describing where you saw the hidden item in the scene. Capitalize the first letter of your entry. We feel the appearance is nicer if this is done.


11. If you cannot remember where the hidden item was located, type "Add position info".


12. Press Enter. The editor will immediately start a second bullet point.
If you have additional positions for the hidden item, add them now.

13. When you have finished adding positions, on the editing toolbar, click on the "bullet list" icon to turn it off.

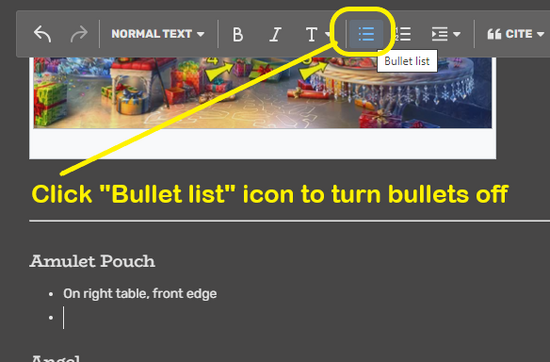
14. The editor will then stop adding bullet points, remove the extraneous bullet point, and move your cursor back to the left side of the page.

15. Type 4 dashes (-).

16. The moment you type the fourth dash, the editor will assume you are trying to insert a line across the page (which you are) and will convert your four dashes to a line.


17. Put a brief description of what you changed in the comment box at the bottom. In this example, "Added Amulet Pouch" would be perfect.
Press SAVE in the lower right corner.


18. Ta da! You completed an edit successfully.

New Position for Hidden Item
You have found a new position for a hidden item in a location. Either
- An item map already exists on the location's page and several positions are listed with numbers.
- No item map exists and there may or may not be bulleted position descriptions. This is particularly likely in the current event location.
You may add a text description for this new position.
- Review the rest of the page to see if some other item is also in that same position. If so, consider using the same terminology for the new entry that you plan to add.
- Capitalize the first letter of your entry. We feel the appearance is nicer if this is done.
- Add the new position as a bullet point.
- If there are already several positions with numbers, see section Add Bullet Line after List of Numbers for specific instructions.
- If the last entry is a bullet point, see section Add Bullet Line after Bullet for specific instructions.
- If there are no entries at all, see section Add Bullet Line to Empty Section for specific instructions.
Add Bullet Line after List of Numbers
1. Use the "Edit section" button for the hidden item you are modifying. For example, if you found a new position for Acorns, you will have to scroll down until you get to the Acorns section.

Use the "Edit section" button
2. Set the cursor at the end of the last numbered entry (you might have to scroll down a little bit). Click ENTER two times to create a BLANK line.


Place cursor; press ENTER twice
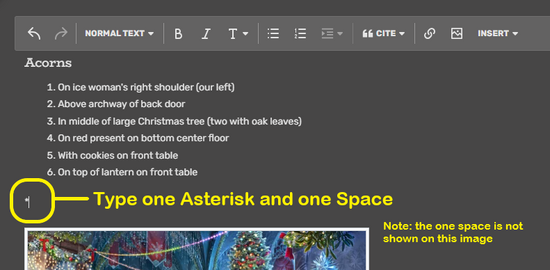
3. Type one asterisk and one space. The editor will assume you are trying to insert a bullet point (which you are) and will convert your asterisk/space to a bullet point.

4. Type a phrase describing where you saw the hidden item in the scene. Capitalize the first letter of your entry. We feel the appearance is nicer if this is done.
Put a brief description of what you changed in the comment box at the bottom.
Press SAVE in the lower right corner.


5. Sample after Save

Sample after Save
Add Bullet Line after Bullet
1. Use the "Edit section" button for the hidden item you are modifying. For example, if you found a new position for Acorns, you will have to scroll down until you get to the Acorns section.
Use the "Edit section" button
2. Set the cursor at the end of the last bulleted entry (you might have to scroll down a little bit). Press ENTER.


3. Since the previous line was a bullet point, the new line will follow suit. Type your new position description. Capitalize the first letter of your entry.
Put a brief description of what you changed in the comment box at the bottom.
Press SAVE in the lower right corner.


Add Bullet Line to Empty Section
1. Use the "Edit section" button for the hidden item you are modifying. For example, if you found a new position for Hot Air Balloon, you will have to scroll down until you get to the Hot Air Balloon section.


2. Set the cursor at the end of the hidden item name. Press ENTER.
Type one asterisk and one space. The editor will assume you are trying to insert a bullet point (which you are) and will convert your asterisk/space to a bullet point.


3. Type a phrase describing where you saw the hidden item in the scene. Capitalize the first letter of your entry. We feel the appearance is nicer if this is done.
Put a brief description of what you changed in the comment box at the bottom.
Press SAVE in the lower right corner.


Item Map with Bulleted Text Entries
If there is an "item map" on the page but all the text entries are still bullet points,
- If this is the current event location, please leave the list alone. Most likely, the person assigned to clean up and number the text has simply not had a chance to do it yet. If you wish, you can add a comment to the page reminding the admin team that this item is still missing its numbered list.
- If this is an older location, you may rearrange the text entries to match the map and you may change them from bullets to numbers. If you do not know how to do this, please leave a comment on the page reminding the admin team that this item is still missing its numbered list.
Item Map with Missing Entry
You have found an "item map" that has a number and arrow on it, however the list of entries is missing that one. You may add the description of the position for the hidden item as a numbered entry. As above, capitalize the first letter of your entry and consider using the same terminology for the new position as something else in that position.
New Name for Existing Hidden Item
In the Hidden City, the game makers have been prone to changing the names of various hidden items. With no advanced knowledge of these, it can create some havoc as the admin team and players scramble to match the hidden item names to new names in the game. If you notice that a name has changed, you can either:
- Notify the admin team by writing a comment on the location's page
- Edit the location's page yourself
The goal is to move the existing information to the new place on the page for the new name and leave a note (saying that the name changed) at the old name. This will help people who are somewhat new to playing the game to recognize and understand item name changes. This can be useful to those who have been exploring the location and using the Wiki for hidden item information, especially if they are not yet accustomed to the habit of the game changing the names of items. After a few events when the new name has become familiar to people, someone on the admin team will remove the old name entry.
To edit the location's page yourself:
1. Use Edit Source on the location page. Hover on the 3 vertical dots and a menu will appear.


"Edit source" near upper right of page
2. LOCATE the original section of the hidden item.
- Example:
- The game is asking for “Pipe” (NEW name)
- There is a section on the location page for “Smoking Pipe” (OLD name)
3. COPY the entire entry, from the subtitle to the dashed line at the bottom (the four dashes) to your clipboard.
4. LOCATE in the hidden items where the NEW name should be placed for alphabetical (ABC) order
- Example:
- Pillow
- <-- Pipe would go here
- Pitcher
5. PASTE the entire entry from your clipboard in the proper place alphabetically for the new name
6. MODIFY the subtitle of the entry to have the new name. Always use the EXACT same spelling, capitalization, and punctuation as the game uses. For example, "Four-leaf Clover" is not the same as "Four Leaf clover".
7. GO BACK to the old entry. Delete the lines for the position entries, the map, and the silhouette pictures. Keep the subheader and the dashed line at the bottom. Add ", See NEW name" after the old name.
- Example: Pipe, see Smoking Pipe
8. If you know how to turn the new name into a link, do so. Otherwise, someone from the admin team will insert the link later.
Add Difficult Silhouette to Gallery
This is a two step process. First, upload your photo to the Wiki. See section How to Upload a Photo.
Second, add your photo to the gallery.
1. Use the "Edit section" button for the Silhouette Gallery, located just above the sub-title bar.


Choose Edit Section button
2. Move your cursor so that it is in the gray area to the right of any existing images. You might need to scroll down slightly to see the existing images. Click once to position your cursor there. The exact spot does not matter; just the general area. The gallery editing box should appear.


Position your cursor right of any images
3. Choose "EDIT" for the gallery.


Choose EDIT
4. Type in a few letters of the start of the name of your image. The system should find it, and show you the visual representation of your image. If you have chosen a common file name start, you may have to type more letters or scroll to find your image. Choose (click on) your image.


Type your file name and choose image
5. Type in a caption for your image (keep it simple). Save your caption by choosing the checkmark.


Type your caption and save the caption
6. Add your image to the gallery by choosing APPLY.


Choose Apply
7. Type in a comment about what you changed ("Added a difficult silhouette"). Choose SAVE.
")
")
Uploading or Replacing Photos
| Uploading or Replacing Photos |
How to Upload a Photo
1. Use the "EDIT" button on the upper right side of the screen. This will bring up the Visual editor.


Choose Edit button
2. Choose the icon for an image.


Choose Image icon
3. Move from the Search tab to the Upload tab. Find or drop your image from your device to the pop-up screen. Agree to the terms. Choose UPLOAD (upper right corner of the pop-up screen).
")
")
4. On the next pop-up screen, you can change the name of the file if you wish. You do not need to fill in a description.

Change file name if desired
5. On the next two pop-up screens, you do not need to do anything. Simply choose the back-arrow in the upper left corner of the screen on the first pop-up and choose the X in the upper left corner of the second pop-up.
")
")
6. If the only thing you have done is upload your photo, you do not need to save on the final screen. You can choose CANCEL.


Cancel out of Visual Editor
7. As you are uploading a photo, you have the option to resize and position it if you wish. During the upload process, click on the file name, then go to "Advanced Settings".
8. If you want to upload photo(s) via source mode, Use Edit Source on the location page. Hover on the 3 vertical dots and a menu will appear. Then choose "Mass Upload". You will be able to find your images on your device and upload them in a manner similar to what is specified for the Visual Editor.
")
")
How to Replace a Photo
You may want to update, or replace, an existing photo.
- Open the page where the photo resides.
- Click on the "i" on the lower right corner of the thumbnail of the photo.
- Scroll down if needed to see the link for "Upload a new version of this file".
- On the next screen, click on "Choose File" to find/choose your new image file.
- Fill in the "File changes:" box with your reason for making the changes. (Do not change the destination file name.)
- Click on "Upload File".
Editing Other Pages
| Editing Other Pages |
You may edit other pages if you see a need. Perhaps you notice a typo or you notice some information that is missing from the page. You may use the visual editor or the source editor. Remember to add a brief description of what you changed to the comment box on the lower left before you save your changes. You can practice your edits on the Test Page if you like.
Related Pages
| Related Pages |